1. Certification
I had already completed various Microsoft Certifications, including the AZ-900. This was as simple as building out the HTML to state this on the site, that I had completed this certification
I also chose to provide a verifiable link to the certificates, so they can be verified.
2. HTML
To be truthfully honest, I did not feel that further developing my rusty HTML skillset, by building out the bare bones of the site myself. I leveraged a Template by CeeVee, to speed up the process, so I could focus my attention on the more exciting stuff - like Azure!
It's worth noting that my rusty skillset allowed me to modify the template, and make the site feel and look like mine. I even went the extra mile here, and decided to implement an additional page for my very own blog, so I could post this : )
3. CSS
This was very much the same story as the HTML...I personally feel like this is a waste of time, when there are toolsets that can be leveraged to increase efficiency.
I did again modify these templates to get the design I wanted, but maybe one day when I have an unlimited amount of time, I will come and revisit and try my hand at building the site in CSS from scratch.
4. Static Website
Before I got started with anything, I decided to configure a budget on my Azure Subscription - that would notify me if my cloud spend cost more than AUD$10 a month, as I wanted this solution to account for minimal cloud spend, and not be shocked by a crazy Azure invoice, if I left some of my other projects running by accident.
If you are new to the Azure world, I would recommend you do the same, so you don't end up like this person
So the details provided by The Cloud Resume Challenge, were pretty on the nose here. They stated that Azure Storage should be used, so I deployed an Azure Storage Account, and got to the configuration.
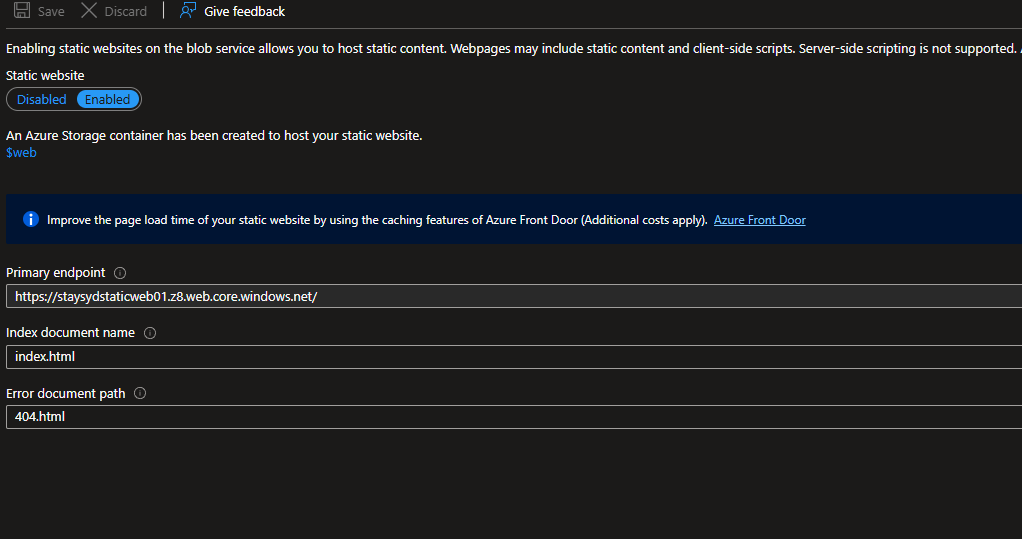
I knew from prior experience within Azure, that the blob service offers a feature called Static Website. Once enabled, this created a $web blob container - that will be used to hold the flat files for the website hosting. I specified my index and error page HTML documents and clicked save to ensure this was enabled.
I was then able to browse to the primary endpoint, provided by the Static Web enabled Storage Account - and voila, I could see my site on the internet!! :D
5. HTTPS & 6. DNS
Well, I could argue that it was already using HTTPS, as the Static Web enabled Storage Account already had HTTPS support, via the primary endpoint. However, the next step specified I use a custom domain name for my static site. so the primary endpoint on the Storage Account was no longer going to cut it.
The challenge pointed me toward using an Azure CDN / Front Door & Azure DNS. I had already registered cmdevelop.com with another domain registar and paid for the next few years, so I chose to not use Azure DNS to keep costs down. I had some very limited experience with CDN's or content delivery networks, and understood the fundamentals so I delved into understanding the difference between Azure Front Door and the classic CDN standard offering
The main difference between these two services, is that Azure Front Door is more optimized toward Dynamic Delivery (ie, Applications or Services that serve content that frequently changes, or is personalized based on user interactions, or other factors), where as the CDN offering is optimized more towards static site delivery. These services both supported custom domains over HTTPS and looked to be fairly similar for the purposes that I would require the services for. I then found that the CDN was a much cheaper option to host on Azure, so I picked this service and deployed it.
I waited for my new CDN to deploy, and then found I needed to deploy a CDN endpoint, so I could map this back to the origin, so I created this specifying a unique name, set my origin type to Storage static website, as this made the most sense. This then allowed me to select my primary endpoint from my static web storage account, as the Origin hostname. I then chose to leave everything else default, as it was prefilled.

I could now access my website directly, using HTTPS & the CDN endpoint. The CDN was using a cached copy of static site, to display the content. I verified this by deleting the index.html file within the $web container, and seeing if this modified the live site, that was accessible via the CDN endpoint.
As expected, this was not updated, but I could see the update directly via the primary endpoint on the static web enabled storage account. This displayed the 404 page, as this did not hold a cached copy. I then purged my CDN via the Azure Portal, waited 5 minutes and the 404 page was now also visible via the CDN endpoint. This is a critical aspect of the functionality of a CDN, as it allowed the files on the site to be able to be deleted, and replaced without affecting the live copy - once I was ready for the changes to be visible to the live copy of the site - I purged the CDN cache, so it could now reference the most up to date data.
Great! My CDN is working exactly as I was expecting it to, next I focused my attention on configuring my custom domain name. First of all, I needed to configure my DNS record, so I logged into my domain registrars portal and created a CNAME that pointed my website / domain hostname at my Endpoint hostname.

I then returned to the Azure Portal, added the custom domain and clicked Save. I waited for this to apply, then clicked on the newly added domain name, and enabled the HTTPS feature. This took some time to complete, as it needs to complete validation and certificate deployment tasks.
Once this had completed, I was able to access my site directly via my custom domain name, over HTTPS - https://resume.cmdevelop.com
There are some other cool features included in the CDN, that allows you to Geo-Filter & Block any requests originating from certain countries. I decided to leave most of my configuration default, but I challenge you to test these features out.
7. Source Control
So, the next step here was to develop some Javascript! My Javascript skills were very rusty, so before I got started I wanted to make sure I setup some source control, to avoid accidentally deleting any of my existing or future code.
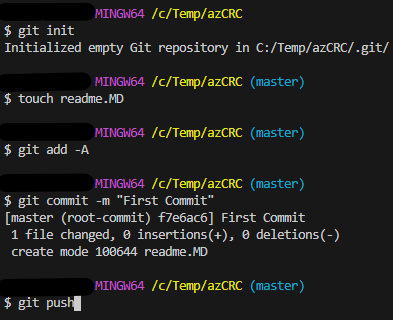
I was already pretty familar with git, and utilizing Github to store projects I am working on, so I initialized a new git repository on my machine and committed these changes to my repository, I also spent some time building out the framework of my ReadMe file. This is my first public repository, so I wanted to make sure this looked presentable and professional for anyone that stumbles across this.
The challenge does state that I should not be manually updating either my back-end or front-end, and that they should automatically update when a change is made to the code. This will be addressed seperately within the CI/CD chapters of this blog post.
It also suggested that I utilize two different Github repositories, but I chose to keep it simple with one, and target my yml workflows to individual folders for the backend & frontend.
8. CI/CD Front End
I was slowly making changes to my site, whilst I was researching and understanding how I could use Cosmos DB & an Azure Function to implement the visitor counter onto the site. I found it to be quite cumbersome, to upload my files to the $web container each time I made a change, that I wanted to make public on the site. Additional to this, I then had to purge the CDN endpoint. This meant logging into the portal each time - which I was not thrilled about...
I looked towards Github actions, as I was already familiar with Azure DevOps Pipelines and .yml files. I found that Github actions were free and unlimited for public repositories, so this was perfect!
To automate the deployment process, I created a .yml file inside the .github/workflows directory of my repository. This allowed me to automatically push changes from my frontend folder directly to the $web container in my Azure Storage Account whenever I committed to the main branch.
The logic here is simple: every time I push changes to the main branch that affect the frontend/ folder, the workflow uploads the updated files to the Azure Blob Storage $web container using the az storage blob upload-batch command. Immediately afterward, I purge the Azure CDN endpoint to make sure the latest version of the site is served to users. Finally, I make sure to clean up the Azure session with az logout.
Initially, I tried to run the action or the workflow file and this failed as it could not login to Azure. After a bit of frustration (and a few failed workflow runs...), I decided to properly investigate the correct way to connect GitHub Actions to Azure. I eventually came across this Microsoft guide, which turned out to be exactly what I needed. Following the steps in that article, I used the Azure CLI to create a new service principal and assign it appropriate access.
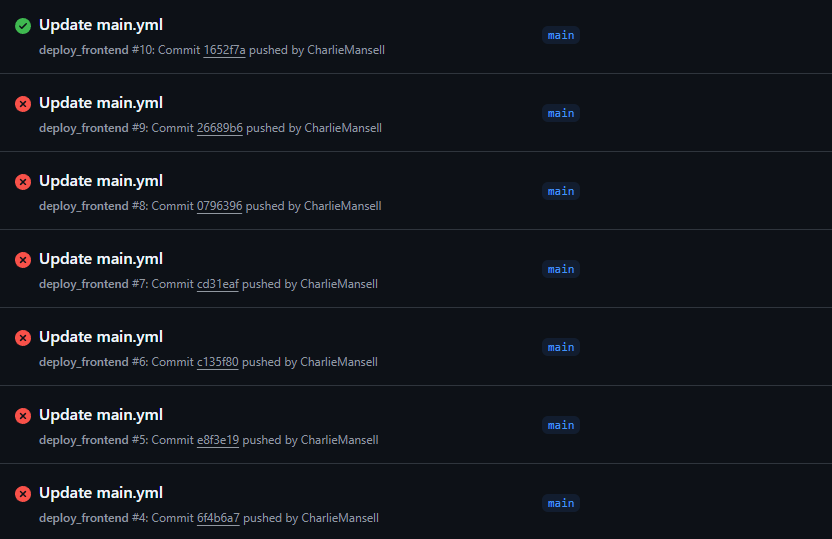
This returned a JSON blob with all the necessary authentication details in the format that the azure login expects. I took that entire output and added it as a new GitHub Secret called AZURE_CREDENTIALS under my repository settings.
After doing this, the login step in my workflow started working perfectly — and my site was automatically deploying with every commit. Success! Using this setup meant no more manual uploads or purging — just commit and push, and GitHub Actions takes care of the rest. It was a small change, but it made a massive difference to my workflow.
9. Javascript
It was now time to start building out the JavaScript that would eventually power the dynamic visitor counter on my site. While I hadn’t yet created the Azure Function or Cosmos DB to store and retrieve the actual count, I knew what the shape of the integration would look like — and I wanted to get the frontend side ready first. JavaScript was fairly familiar to me at a fundamental level, especially after having built a few React projects over the past few months. I knew I’d need a script that would:
To start, I added a DOMContentLoaded event listener so that my script would only run once the page’s HTML had fully rendered. Then, using the fetch() function, I planned to retrieve the count from the backend. Once I had that value, I’d target the counter element using document.getElementById('counter'), and replace its contents using .innerText.
Even though I didn’t have a working backend yet, I structured the code to call a placeholder URL for now, and added basic error handling in case the fetch failed — which, at this point, it always would.
This approach let me build and test the visual experience right away, so I’d be able to drop in the backend connection seamlessly once the API and database were up and running.
10. Database
With the front end logic in place and ready to consume an API, it was time to set up the backend storage — starting with the database. For this challenge, I chose to use Azure Cosmos DB. It's a globally distributed NoSQL database service from Microsoft, and while it might have been overkill for something as simple as a visitor counter, it was a great opportunity to get hands-on with it — and it integrates beautifully with Azure Functions through bindings. I used the learning tier to keep costs down.
I created a Cosmos DB account in Azure within the same resource group, as the rest of my services, and then created;
At this point, I had my database structure in place and a connection string ready to go. I initially attempted to connect directly to the Cosmos DB using just the URI and connection string from my JavaScript — but quickly ran into authentication issues. As it turns out, Cosmos DB requires properly signed authorization headers for direct access, which makes it a poor candidate for client-side interaction.
This was actually a good thing — exposing the database directly to the browser would have been a major security risk. Instead, it confirmed what I already suspected: I needed a secure API layer between the frontend and the database. That’s where Azure Functions would come in.
11. API
With the frontend wired up and Cosmos DB ready, the next step was to build the API layer — a middleman that could safely read and write to the database without exposing sensitive credentials to the client. For this, I used Azure Functions — a serverless compute service that lets you run small bits of code without worrying about infrastructure. It was perfect for this use case: a lightweight, event-driven backend triggered by HTTP requests.
I used the Azure Functions extension in Visual Studio Code to scaffold the project. After installing the extension, I hit F1, searched for Azure Functions: Create New Project, and followed the prompts. I chose .NET as the runtime (as I wanted to challenge myself with C#, rather than Python), selected HTTP trigger, and proceeded with the default options for the initial setup.
C# was new territory for me — I’d seen it used in various enterprise projects but hadn’t yet written anything production-worthy myself. This challenge gave me the perfect excuse to dive in. I quickly learned that, thanks to Azure Functions’ support for bindings, I didn’t need to write a ton of boilerplate code to interact with Cosmos DB.
I created a simple model called Counter with two properties: id and count. Then, I wired up the function to use input and output bindings for Cosmos DB. These bindings allowed the Azure Function to:
To make this work, I needed the Cosmos DB connection string from the previous step. I added this to the local.settings.json file under the key AzureResumeConnectionString. This file is essential for running and testing the function locally, as it securely stores runtime configuration values without hardcoding them in the source code. When I deployed the function to Azure, I made sure to replicate the same key in the Application Settings of the Function App — keeping things consistent between environments.
The function itself was triggered by a simple HTTP GET request. When called, it would:
I found it incredibly powerful how the [CosmosDB] binding could handle both the input and the output just by defining them as parameters — it made the code clean and easy to follow. That said, understanding the syntax around bindings, the required attributes, and the naming conventions took a bit of trial and error.
Along the way, I learned:
Once everything was wired up locally, I tested the function using the built-in func runtime, and set the local func API within my front-end Javascript code, and confirmed that it was correctly incrementing the value in the database and returning the updated count to the client. The added benefit of being able to run these locally, is that I did not incur a cost for running the function, so I could test this with a whole lot of trial and error!
Deploying the function to Azure via VS Code (using the Advanced deployment option) was seamless, and it allowed me to select the correct resource group and keep all of my services neatly together.
After deployment, I ran into one final issue — the frontend was failing to fetch the API, and browser dev tools pointed to CORS. I quickly updated the CORS settings in the Function App configuration to allow my frontend's domain (e.g. https://resume.cmdevelop.com) — and as soon as that was in place, everything clicked. The counter started updating live on page load, just as I’d planned.
12. Tests
As I was working through the Function logic, I also wanted to build in a bit of automated testing — something that would validate the API behavior before I deployed it. Since I was planning to integrate this into a backend GitHub Actions workflow (more on that next), I knew these tests could act as a safeguard: the function wouldn’t deploy if the logic ever broke.
I wrote a basic unit test using xUnit. Its goal was simple: simulate a request to the Azure Function, and check that the visitor count was correctly incremented by one.
To do this, I created mock versions of the HttpRequest and ILogger objects using a factory pattern (TestFactory), and passed them into the function along with a dummy Counter object. The test then asserted that the count value was incremented as expected.
While it doesn’t hit a real database or run in a hosted environment, it does validate the core logic of the Function — which is exactly what I wanted. And by placing this in the test project (tests.csproj), I was able to run this test as part of my CI/CD pipeline before deploying anything.

13. CI/CD Back End
With the frontend GitHub Actions workflow already working smoothly, I wanted to bring the same automation to the backend. My goal was simple: every time I pushed a change to the backend/ folder on the main branch, I wanted GitHub to:
This is exactly what my backend workflow does. Here’s the logic behind the GitHub Actions workflow I created:
This setup gave me confidence that any logic changes to the Function would be vetted automatically. The build step compiles the Function App in release mode, while the testing step runs the unit tests I had previously written to validate the core behavior — specifically ensuring the visitor count increments correctly.
By placing this check before deployment, I created a safety net: if any test fails, the deployment step is skipped entirely. This helps prevent pushing a broken version of the function to production — something I really valued as I was iterating quickly and learning on the fly.
Once the tests pass, the workflow publishes the output to Azure, using the Function App name and package path I defined in the environment variables. The workflow also logs into Azure using the credentials securely stored as a GitHub secret (the same credentials I defined for the front end), keeping everything streamlined and secure.
Integrating testing into the pipeline was a small but powerful step. It elevated my confidence in the changes I was making — and gave me a much deeper understanding of how CI/CD pipelines can enforce reliability through automation.
14. IaC
To wrap up the challenge, I wanted to demonstrate some Infrastructure as Code — not through another GitHub Actions workflow, since I had already showcased automation extensively, but to show how powerful and approachable Azure Bicep can be for defining resources declaratively.
I started by logging into the Azure Portal and downloading the existing ARM templates for the resources I had built manually. From there, I decompiled the ARM templates into Bicep, giving me a readable and editable representation of my infrastructure.
The process was a bit trial and error at first. I’d make changes to the Bicep file, attempt to deploy it into a new resource group, and refine it until I could get a consistent and clean deployment. This iterative process really helped me understand the resource dependencies and how Bicep handles parameters, names, and linked services.
One intentional decision I made was to exclude the Azure Function from the Bicep deployment. Since I already had a solid CI/CD workflow in place for deploying function code via GitHub Actions, I didn’t want to overcomplicate the infrastructure layer. Instead, I manually created the Function App from VS Code, and once my Bicep file had finished provisioning the rest of the environment (like the storage account and Cosmos DB), I simply pushed updates to the frontend and backend through the respective pipelines.
This gave me the best of both worlds: repeatable infrastructure deployment with Bicep, and continuous, test-driven function deployment through CI/CD. It also helped me better appreciate how manual steps, IaC, and pipelines can all work together in a flexible DevOps workflow.
15. Blog post
Completing the Cloud Resume Challenge was more than just ticking off technical tasks — it was a genuinely rewarding learning journey that brought together frontend development, backend APIs, cloud services, CI/CD automation, infrastructure as code, and now, writing about it all.
Throughout the challenge, I pushed myself to try new tools and approaches — like working with C# and Azure Functions, writing automated tests in xUnit, structuring my deployment pipelines, and getting hands-on with Bicep. Each step helped solidify my understanding of modern cloud-native development, and by the end, I had a much more complete view of how all these pieces can work together in a real-world project.
And of course, there was one final step to complete the challenge: writing a blog post. Instead of publishing it on a platform like Dev.to or Hashnode, I decided to build the blog directly into my own resume site — keeping the project fully self-contained and completely mine from end to end.
Surprisingly, writing this blog became one of the most enjoyable parts of the whole experience. It pushed me to slow down, reflect, and explain what I’d learned in a way that someone else could follow. What started as a requirement turned into something I’ve genuinely come to enjoy — and it’s definitely sparked my interest in writing more technical content in the future.
If you’d like to see the full source code for this project — including the frontend, backend, infrastructure templates, and GitHub Actions workflows — you can check it out in my public GitHub repository.
